Saturday, November 30, 2013

Making Toys


Over the Thanksgiving weekend we were excited to have many visitors...among them 7 of our grandchildren.  Over the years they have helped the woodworker with various projects in the garage.  This weekend was no different.  The woodworker has been busy tracing and cutting out wooden toys.


Some of the grandchildren helped out with sanding the toys...


and adding the wheels.


There was quite a fleet of toys by the time they all finished.


Later they took the toys and donated them to a local agency that helps children and families.


At this season, doing a little giving is a good way to show gratitude for all of our blessings.

Tuesday, November 19, 2013

Miscellaneous views from the museum

The same museum containing the scouting exhibit had some other items that interested me.  Sadly the lighting was terrible for pictures.  This statue was taken from a church that was being remodeled or torn down in the Los Angeles area.  It is hard to see, but if you look at the window in front of him, you can see the spires of the temple.  I thought the statue was really big, but we were told that is was only 1/3 of the size of the ones used on temples.


 Then we found this podium.  It is a replica of the one in the conference center.  A sign on it said to feel free to stand behind it, so we just had to try it out.  Hidden back there are: a white background to reflect light properly, a clock, a microphone and a sort of built in screen where speeches can scroll.


I always have to take pictures of handcart pioneer sculptures...just because.


Celebrating Boy Scouts

Today we visited an exhibition celebrating 100 years of Boy Scouts in our area of the world. The exhibit was somewhat interactive in that there were knots to be tied, bugle calls to identify and various other activities.

Among the displays were these two idea for displaying scouting memorabilia...patches, pins, etc.  The first displays everything in sort of a shadowbox way.  The second has the memorabilia placed in/on a quilt.  If I had seen these ideas years ago, it would have been fun to make such a display.  One of the facts I learned today is that our family has a rare scouter, in that he is one of only 4% of scouts who attain the rank of Eagle Scout.


We learned that the current scout law has changed from the original.


Numerous original paintings on display depicted various scout activities and values by several different artists.


The majority of the paintings were done by Norman Rockwell.


Norman Rockwell also did much of the art for Boys' Life magazine, so many old magazines featuring his work were also on display.  I remember liking to read my brother's copy of the magazine when it arrived.

Saturday, November 9, 2013

The Tale of a Kitchen Table


It was back in the 1920s or earlier that a little family consisting  of parents, Ernest and Ruby and 3 young children, Dean, Kay and Roma, found a small table that would fit in their small kitchen. In the furthest back memories of the little girl, the table had a natural finish with a 'drawer' that could be opened to store  things.  Because the kitchen was so small, the table was stored up next to the wall near the coal stove when not in use, so it had castors on the legs to make it easy to pull out whenever it was time to eat. Ruby sat at the end nearest the stove and Ernest sat on the other end.  Dean and Roma sat on the side nearest the wall and Kay on the other side. We think the table was not new when it came to their home.  Ruby always covered the table with a piece of oilcloth and a tablecloth.  At some point, it was painted green and the top was nailed in such a way that the 'drawer' would no longer open.  Many years later, Ernest and Ruby got another kitchen table, so the little battered, green table was relegated to the basement.  About 1984 or 1985 the table found a new home in the 'fruit room' in the basement of my parent's home.  There it stayed until just a month or so ago when it was time to downsize the possessions in that home.


This time the poor little table journeyed to my home where its makeover was to take place.  The first step was to partially disassemble the table in order to  be able to sand some of it easier.  To our surprise we learned that the table had a couple of little secrets!  The 'drawer' was not really a drawer.  The table top was apparently originally hinged so that about 2/3 of the top could lift up...like a desk.  A desk?  We also noticed from looking at  the side of the table that opened to gain access to the storage area below,  that the table was not always a table.  On each side of the opening a small triangular piece had been added to make the table top flat.  The little table really was probably a desk in its first life.  When it came to my grandparent's home it was already well used.  We have no idea how old it actually is, but we did notice that some of the small nails in the interior of the table were square-headed.


 The woodworker really wanted to take the table completely apart, but after all these years, the glue holding it together was doing a REALLY good job, so the best option was to just strip off the paint with a combination of paint stripper and sanding.


Once all of the paint was off, it was time to glue and clamp the pieces back together.  In the background you can see 2 chairs standing on the workbench.  They will be the next project to finish so they match the table.


The table top pieces took a trip through the sanding machine.


Once the sanding was all finished, the table was dry-fitted back together to make sure everything still fit properly before the final glue job. The woodworker also installed new hinges so the table top would open again.


 Next the primer was applied.


 The last step was to put on the red mahogany stain and then urethane and wax.


Hopefully the little table will enjoy its new home and last many more years.

Sunday, October 20, 2013

The Birth of a Spoon


The woodworker's friend, the spoon carver, decided to demonstrate the making of two wooden spoons  using traditional hand tools recently.  He used two different types of wood; silver beech and maple.  First he had to split a piece off a log to make a spoon blank.

 
Here is a the wood the spoon will be made out of.


Next he decides what type of spoon he wants to make and traces a template on the wood.


The next step is to cut out the basic shape of the spoon using a coping saw.


After the basic shape is made, he places the wood on his shave horse so he can use a spoke shave to round the handle and the back of the bowl portion of the spoon.


A bent gouge is used to gouge out the interior of the spoon bowl.


Holdfasts are used to hold the spoon securely.


Next he makes a smoother finish of the handle with the spoke shave.


He uses a metal scraper to finish the interior of the spoon bowl.


And there you have it....two completed spoons.  The lighter one is maple and the darker one is the silver beech.


Thursday, October 17, 2013

Homestead House Memory Box


When we visited the homestead house in July, we found it in pretty rough shape.  The basement walls are starting to cave in.  The interior of the upstairs is mostly gutted and severely vandalized.  Realizing that this might possibly be the last time we would be able to visit the house before vandals burn it or someone bulldozes it for safety reasons, we removed some of the old rough cottonwood floorboards and brought them home with us in hopes of making 4 boxes.  The woodworker decided that he didn't want to sand the old boards down to a shiny finish as he wanted the saw marks on the boards to stay visible.  The nail holes are also not filled in in any way.  This first picture shows a piece of one of the boards before it was used.


Here you can see that the boards have been sanded slightly.  The dovetails for the corners have been cut by hand.


These are some of the tools used to cut the dovetails


Putty is used to fill in the joints


Here they are all puttied and waiting to be sanded.


Now that the box has been made, the top needs to be cut off.


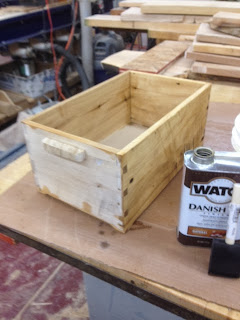
Next a light coat of Danish oil finish seals the wood a bit.


Here are 4 boxes finished except for the hardware.


Once the hardware is attached, the boxes are finished.


Of course, one of the boxes is for us to keep.  We are considering using decoupage to fix a few pictures of the homestead house in place inside the lid.